コネクタープライベートネットワーキングの紹介 : 今後のウェビナーに参加しましょう!
Real-Time Serverless Ingestion, Streaming, and Analytics using AWS and Confluent Cloud
Get started with Confluent, for free
Watch demo: Kafka streaming in 10 minutes
Due to the distributed architecture of Apache Kafka®, the operational burden of managing it can quickly become a limiting factor on adoption and developer agility. For this reason, it is important to have easy access to a cloud-native, fully managed Apache Kafka as a service that frees you from operational complexities, so you can focus on application development and not on having to become experts at managing infrastructure.
This is where Confluent Cloud comes in. Built as a cloud-native service, Confluent Cloud offers a serverless experience with self-serve provisioning, elastic scaling, and usage-based billing so that you pay for what you stream and not for provisioned infrastructure. Confluent Cloud protects your data using industry-standard security features, and the service reliability is backed by an enterprise-grade uptime SLA. In addition to fully managing your Kafka clusters, Confluent Cloud also has fully managed components including Schema Registry, connectors to popular cloud services such as Amazon S3 and Redshift, and ksqlDB, enabling you to harness the full power of real-time events without any of the operational burden.
As part of the AWS Partner Network (APN), Confluent enables AWS customers with their real-time event streaming needs. In fact, we have already announced our Service Ready Redshift designation for real-time analytics as well as Outposts for hybrid cloud streaming.
This post provides an overview of AWS serverless services and step-by-step instructions on seamlessly streaming data from Confluent Cloud to Amazon Timestream using the AWS Lambda Sink Connector, which will be generally available in the very near future. The example that follows shows how you can build an application to capture, process, and analyze event streams in real time using Confluent Cloud and AWS together, without managing any infrastructure.
AWS serverless services
AWS Lambda is a compute service that lets you run code without provisioning or managing servers. AWS Lambda runs your code only when needed and scales automatically, from a few requests per day to thousands per second. You pay only for the compute time you consume—there is no charge when your code is not running. With AWS Lambda, you can run code for virtually any type of application or backend service—all with zero administration. AWS Lambda runs your code on a high-availability compute infrastructure and performs all of the administration of the compute resources, including server and operating system maintenance, capacity provisioning and automatic scaling, code monitoring, and logging.
Amazon Timestream is a fast, scalable, fully managed, purpose-built time series database that makes it easy to store and analyze trillions of time series data points per day. Timestream saves you time and cost in managing the lifecycle of time series data by keeping recent data in memory and moving historical data to a cost-optimized storage tier based on user-defined policies. Timestream’s purpose-built query engine lets you access and analyze recent and historical data together without having to specify its location. Amazon Timestream has built-in time series analytics functions, helping you identify trends and patterns in your data in near real time.
Amazon QuickSight is a fast, cloud-powered business intelligence service that makes it easy to deliver insights to everyone in your organization. As a fully managed service, QuickSight lets you easily create and publish interactive dashboards that include machine learning insights. Dashboards can be accessed from any device and are embedded into your applications, portals, and websites. With pay-per-session pricing, QuickSight allows you to give everyone access to the data they need while only charging for what you use.
Synthesis of services
By combining these services with Confluent Cloud, you benefit from a serverless architecture that is scalable, extensible, and cost effective for ingesting, processing and analyzing any type of event streaming data, including IoT, logs, and clickstreams. With Confluent Cloud source connectors, the real-time data streams can be processed along with historical events in order to extend the value of your real-time application. Let’s pretend the Datagen source connector generated events are the results of a ksqlDB application that filters stocks symbols with a delta of 5% or greater in a 60-minute window, and we’ll insert these into Timestream for analysis.
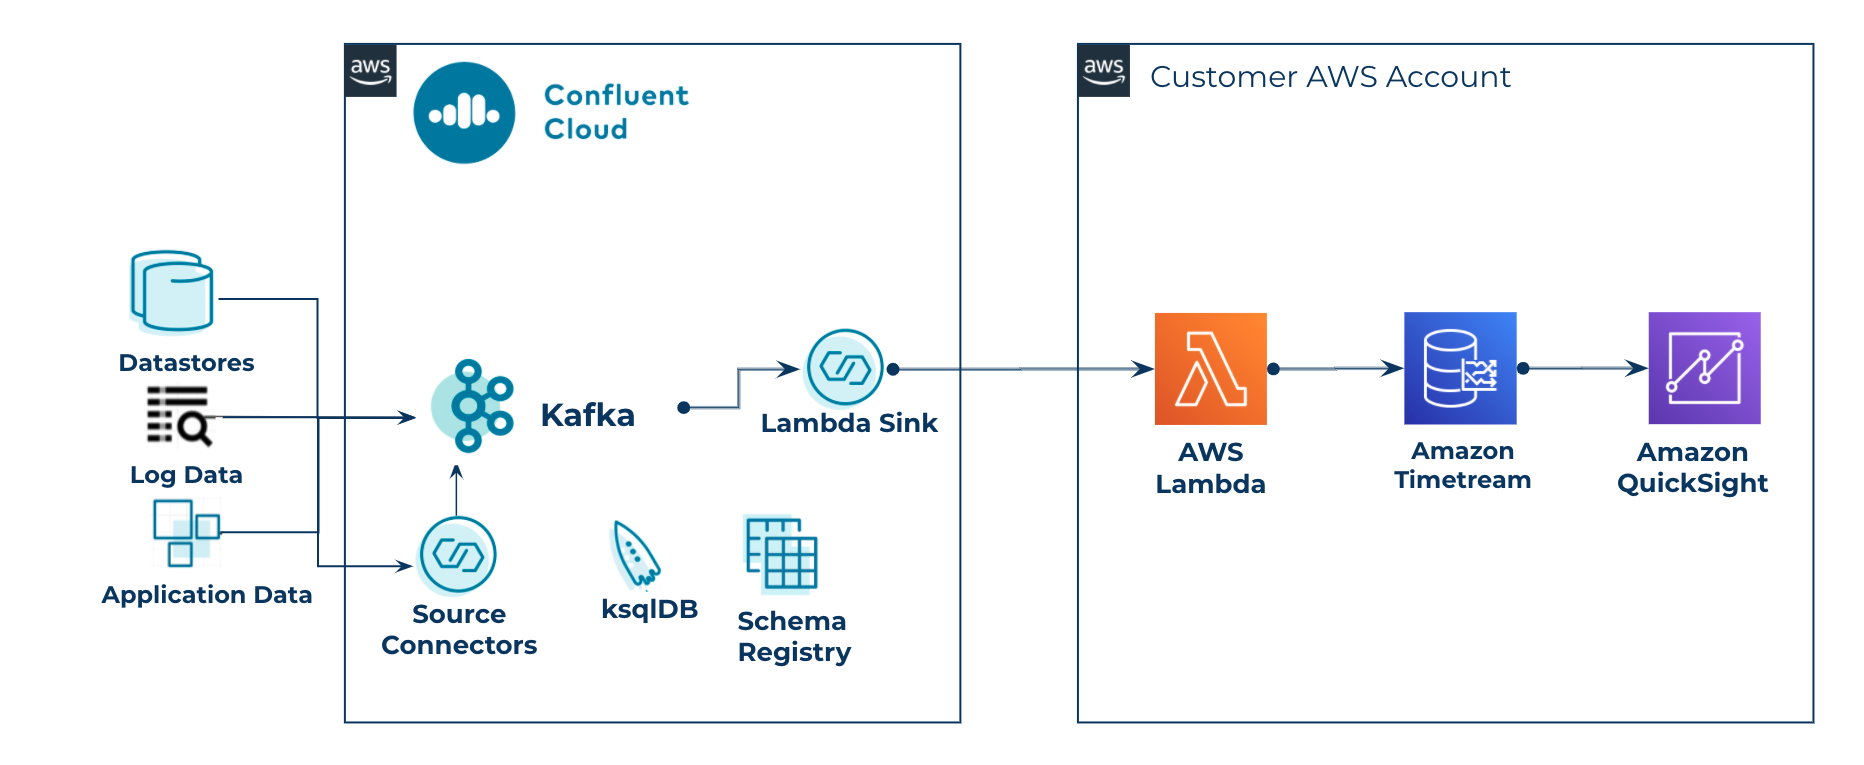 Serverless reference architecture for ingesting real-time events to a time series database for long-term analysis
Prerequisites
- This blog post assumes that you already have an active AWS account. If you do not already have one, create and activate a new AWS account.
- This blog post assumes you already have an active Confluent Cloud account. If you do not already have one, sign up for Confluent Cloud on AWS Marketplace, as detailed in these steps.
| ℹ️ | For new account signups, you’ll receive $400 to spend within Confluent Cloud during your first 60 days. That would be plenty of usage to run this demo many times over, on us. You can also use the promo code CL60BLOG to get an additional $60 of free Confluent Cloud usage.* |
Create AWS Resources
The AWS CloudFormation script will deploy:
- A Timestream database and table
- A Lambda service role with necessary permissions, as well as an Identity and Access Management (IAM) user for Lambda authentication
- A Lambda function that will receive streaming data from the fully managed AWS Lambda Sink Connector and insert the records into Timestream table
Click on the below button to launch the CloudFormation template, which will spin up the required resources for this tutorial:
![]()
On the “Quick Create Stack” page, acknowledge the resource creations and click Create stack. It may take a few minutes to complete the stack creation. The stack name is already populated as Confluent-Serverless-Blog.
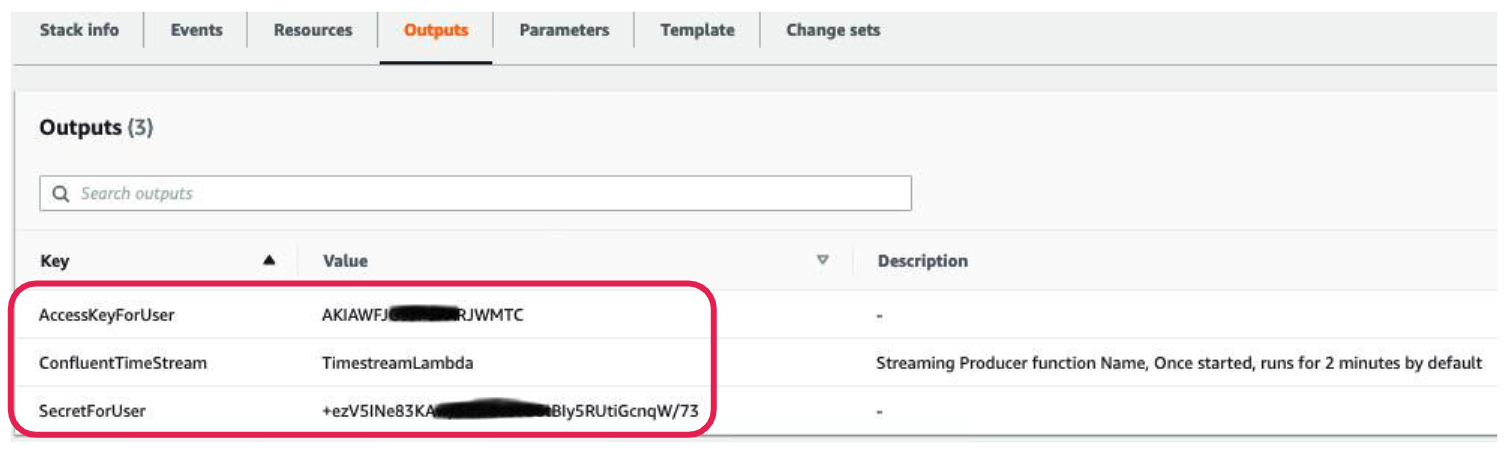
Once created, navigate to the Stack Output tab and note down AccessKeyForUser, SecretForUser, and the Lambda function name labeled ConfluentTimeStream. We will need these in future steps.
Create Confluent Cloud resources
Create a Kafka cluster
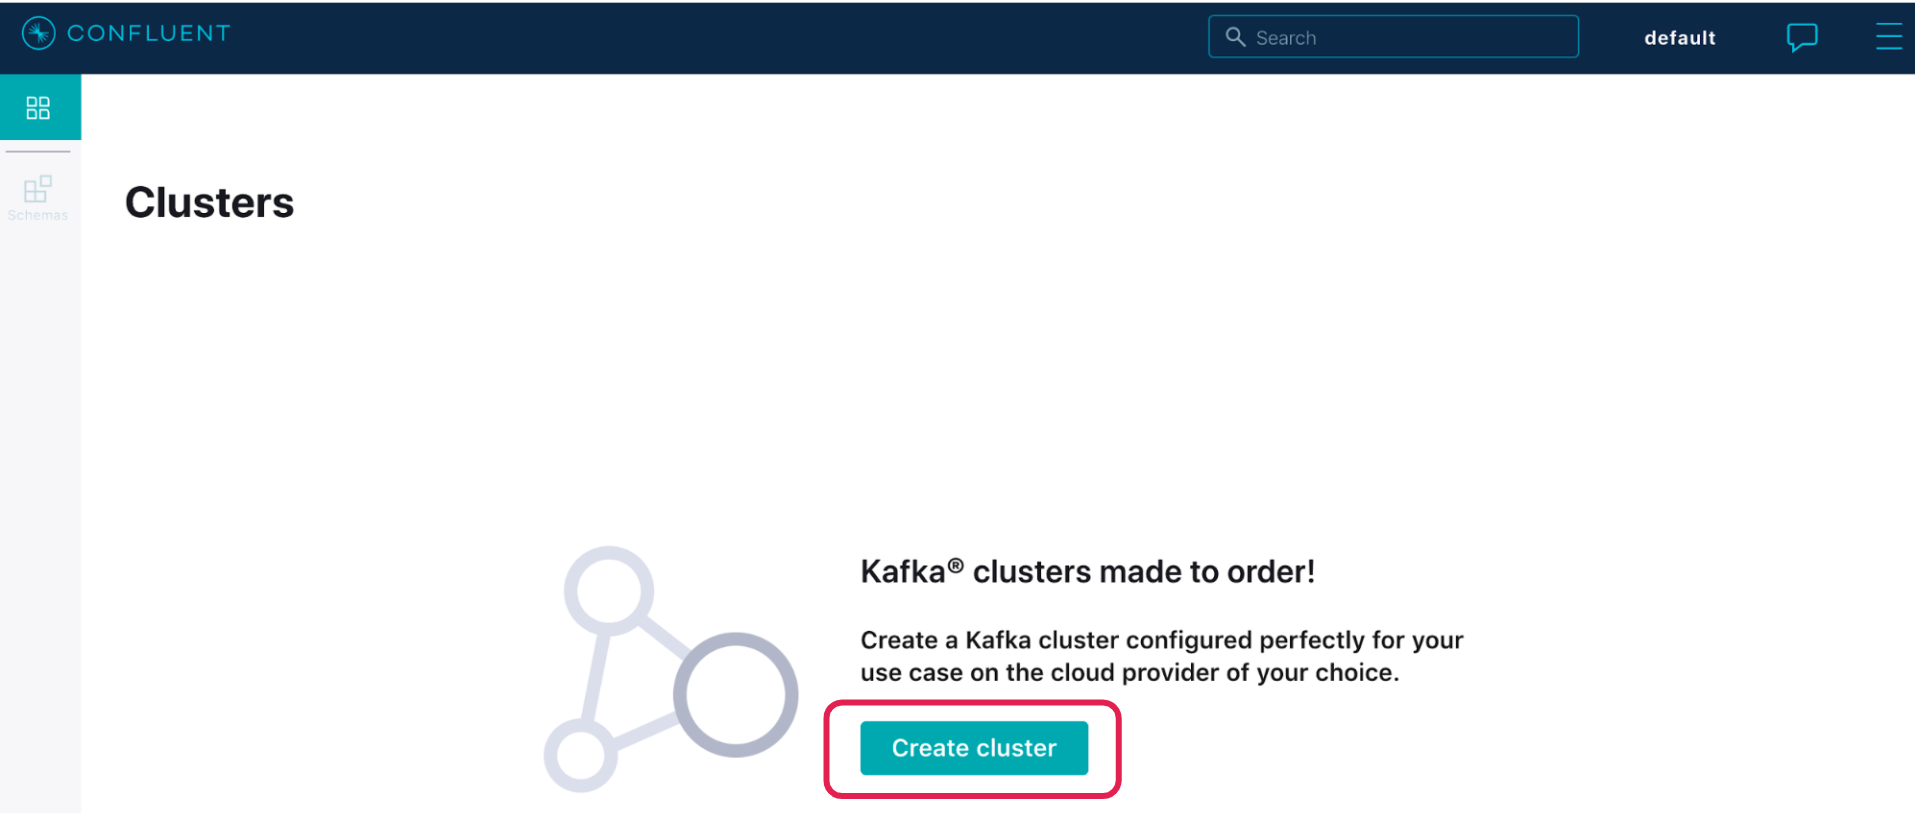
Now launch the Confluent Cloud console from another tab on the browser.
Once logged in, click Create Cluster (or + Add cluster if you already have one running) to create a new Kafka cluster. If you already have a cluster, you can also create a new topic there to complete the exercise.
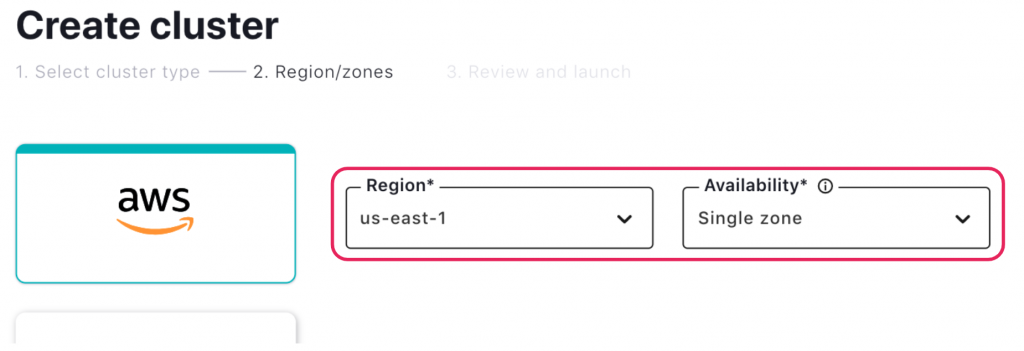
On the next page, select the Basic cluster type and click Begin Configuration. Select Amazon Web Services as the provider, us-east-1 as the region, and Single Zone as the availability. Then click Launch. Confluent Cloud also offers multi-AZ Standard and Dedicated clusters, but we’ll use Basic for the purpose of this tutorial.
On the next page, provide a name for the cluster, say, Serverless-Blog, and click Launch Cluster. In a few minutes, your cluster will be ready to use.
Create a Kafka topic
Once the cluster is started, create a topic. Click on the cluster, click Topics on the left navigation bar, and then click Create topic (+ Add a topic if one already exists). Give it a name like stockTopic and select the number of partitions required (the default is six). Then click Create with Defaults.

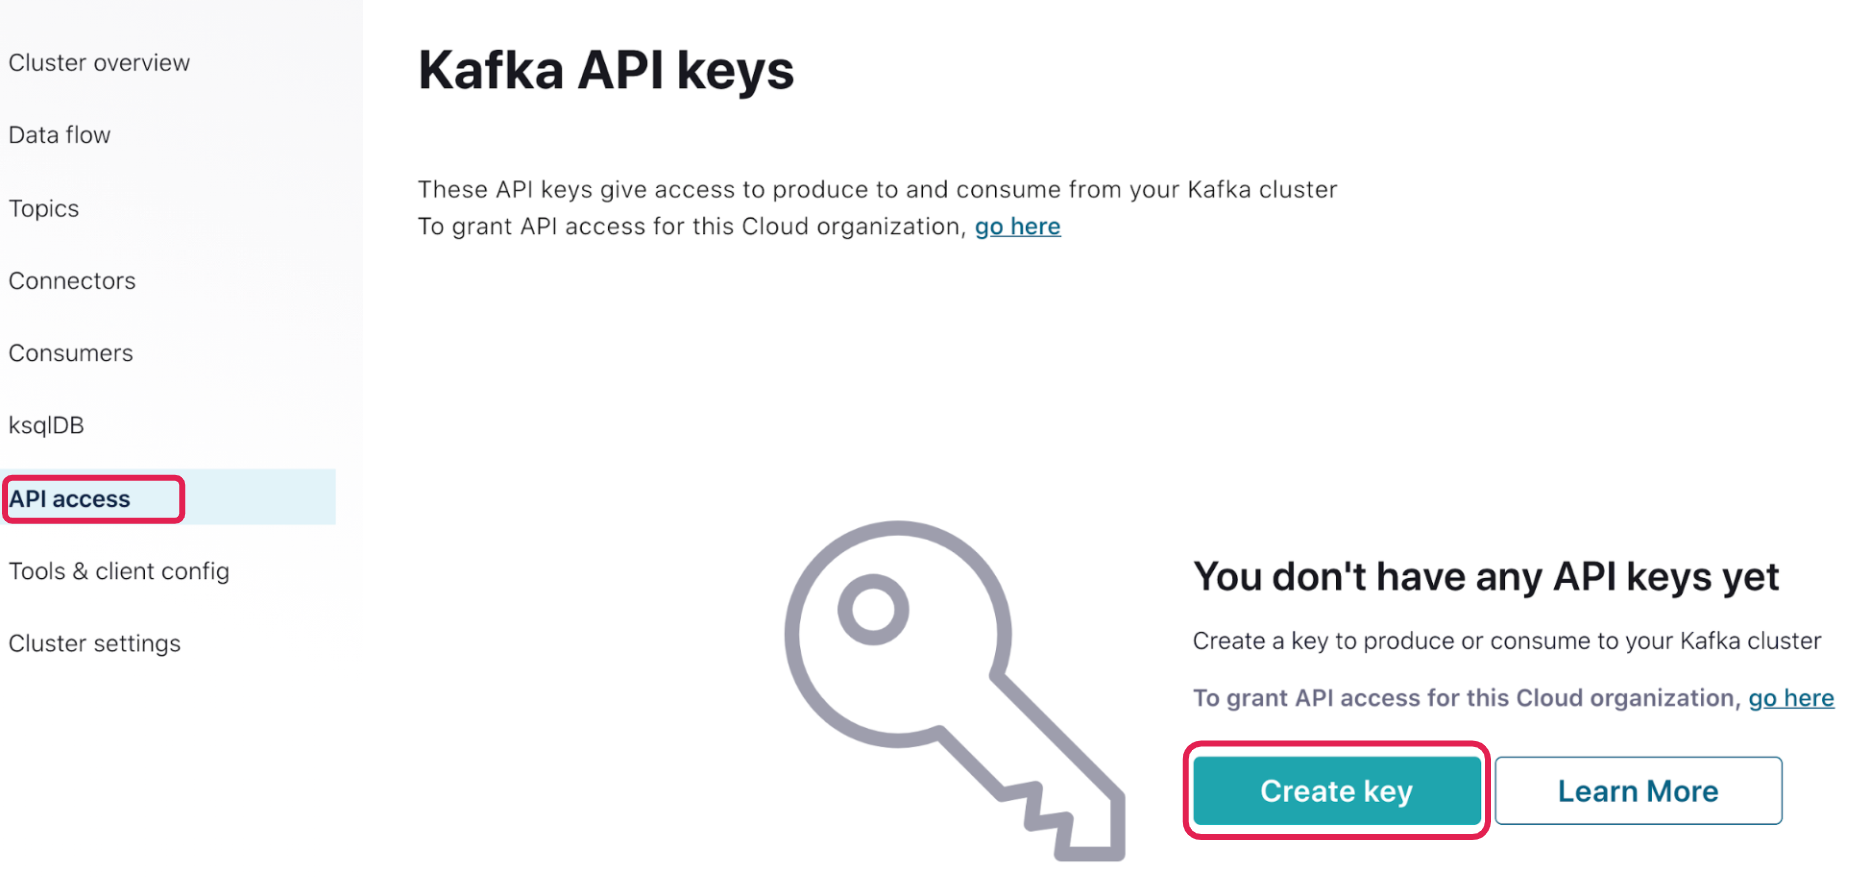
Create Kafka API keys
After the topic is created, click on API access in the left navigation bar. Click Create Key. (If you are an existing Confluent Cloud user and already have a key, you can use the same key or create a key for this hands-on tutorial.)
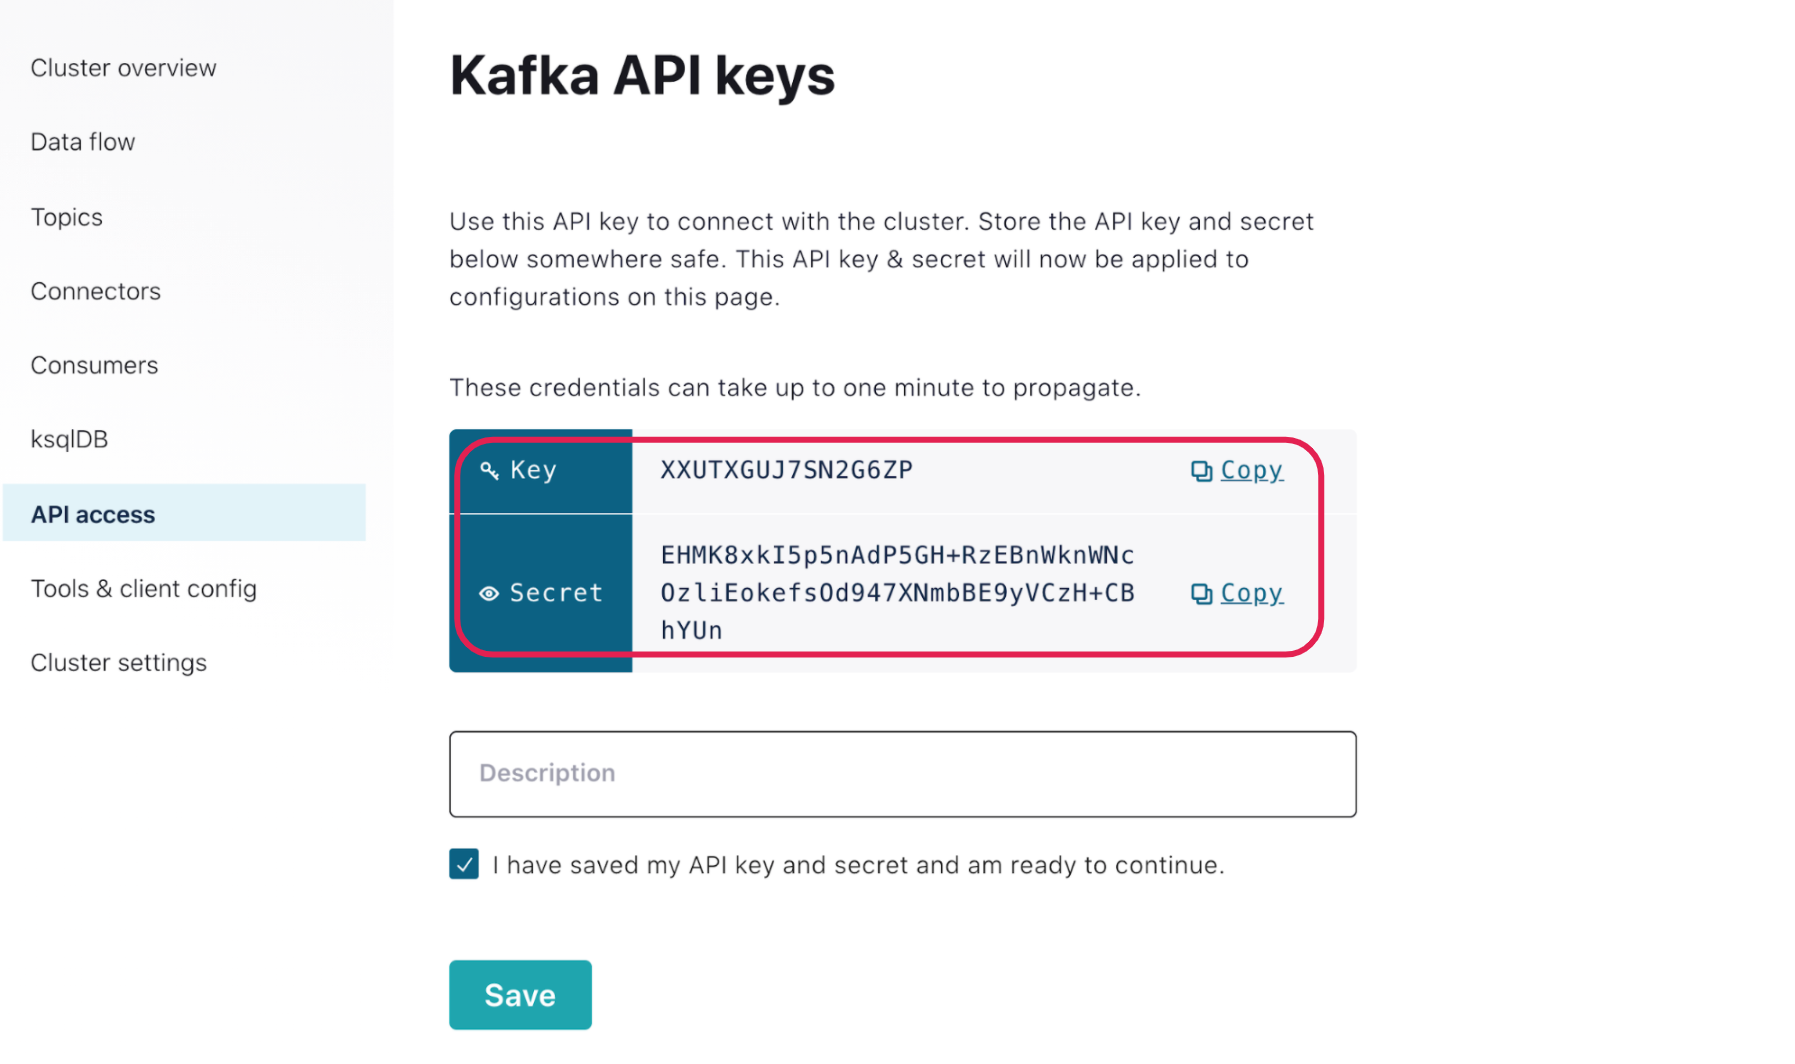
Choose the Create an API key associated with your account option, then click Next. Make sure to note down the Key and Secret before acknowledging, “I have saved my API key and secret and am ready to continue.” Then click Save, as you will not be able to view the secret once the pop-up closes. You will need these values in later steps.
Enable Schema Registry for Confluent Cloud and create API keys
Return to Topics > stockTopic, and click Schema on the navigation bar. Choose Amazon Web Services (AWS) as the cloud provider, U.S, for the region, and click Enable Schema Registry. Using the Confluent Schema Registry for this step prevents application incompatibility that can disrupt consumers by defining standard schemas in Avro, Protobuf, or JSON to build a common language for all your apps and services to communicate.
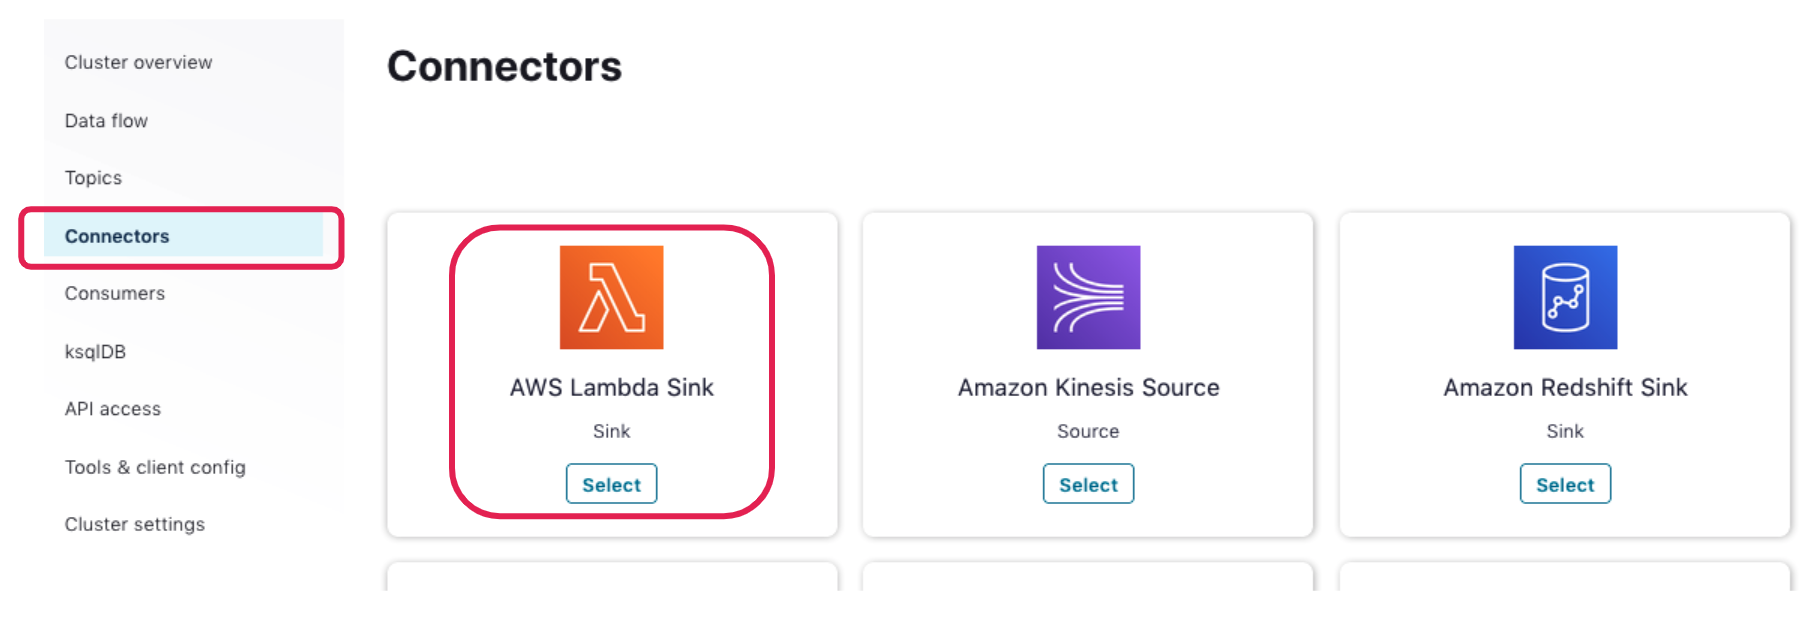
Configure the AWS Lambda Sink Connector for Confluent Cloud
Navigate back to “Cluster” and click Connectors on the left navigation bar. From the options, select the AWS Lambda Sink.
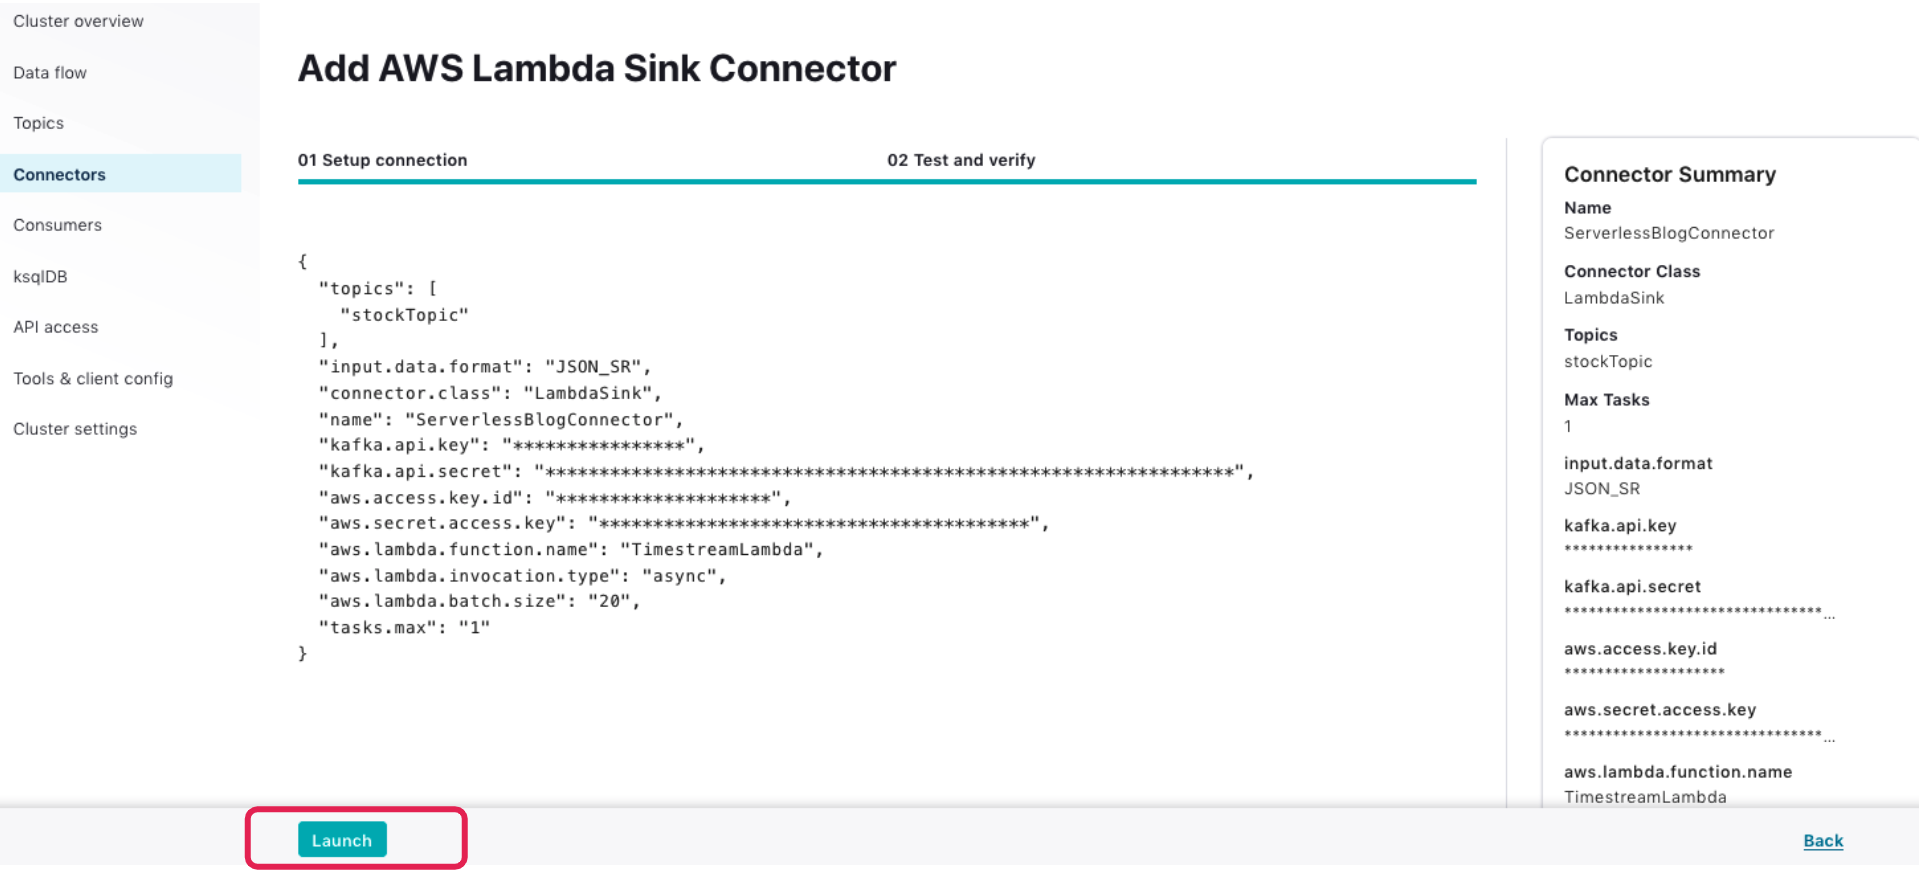
On the “Add AWS Lambda Sink Connector” page, enter the information below. You can leave non-mandatory fields empty; the UI will pick default values:
| Topics | stockTopic |
| Name | ServerlessBlogConnector |
| Input Message Format | JSON_SR |
| Kafka API Key | <Kafka_Key> |
| Kafka API Secret | <Kafka_Secret> |
| AWS Access key ID | <AccessKeyForUser from CloudFormation output> |
| AWS Secret access Key | <SecretForUser from CloudFormation output> |
| AWS Lambda Function Name | TimestreamLambda |
| AWS Lambda Invocation Type | async |
| Batch Size | <Enter a value of leave blank [default is 20]> |
| Tasks | 1 |
Before provisioning, you’ll see the cost of the connector, which includes the hourly rate for one task and additional charges per GB streamed. Pricing varies by AWS region.
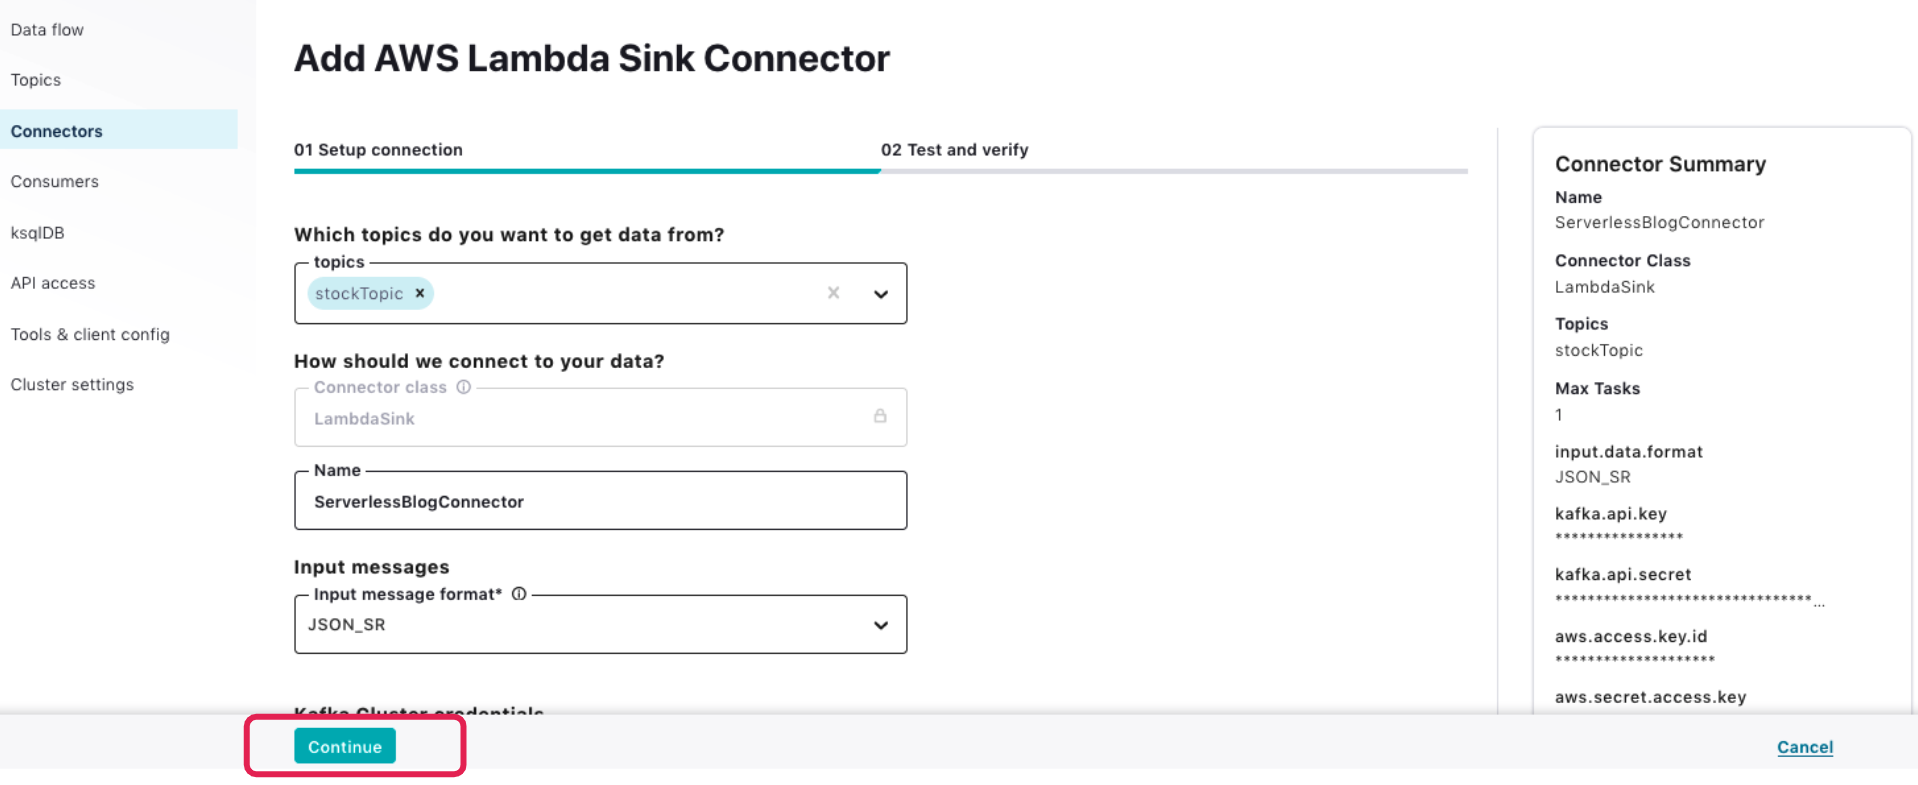
Click Continue to proceed. On the “Test and Verify” page, click Launch to deploy the Lambda connector.
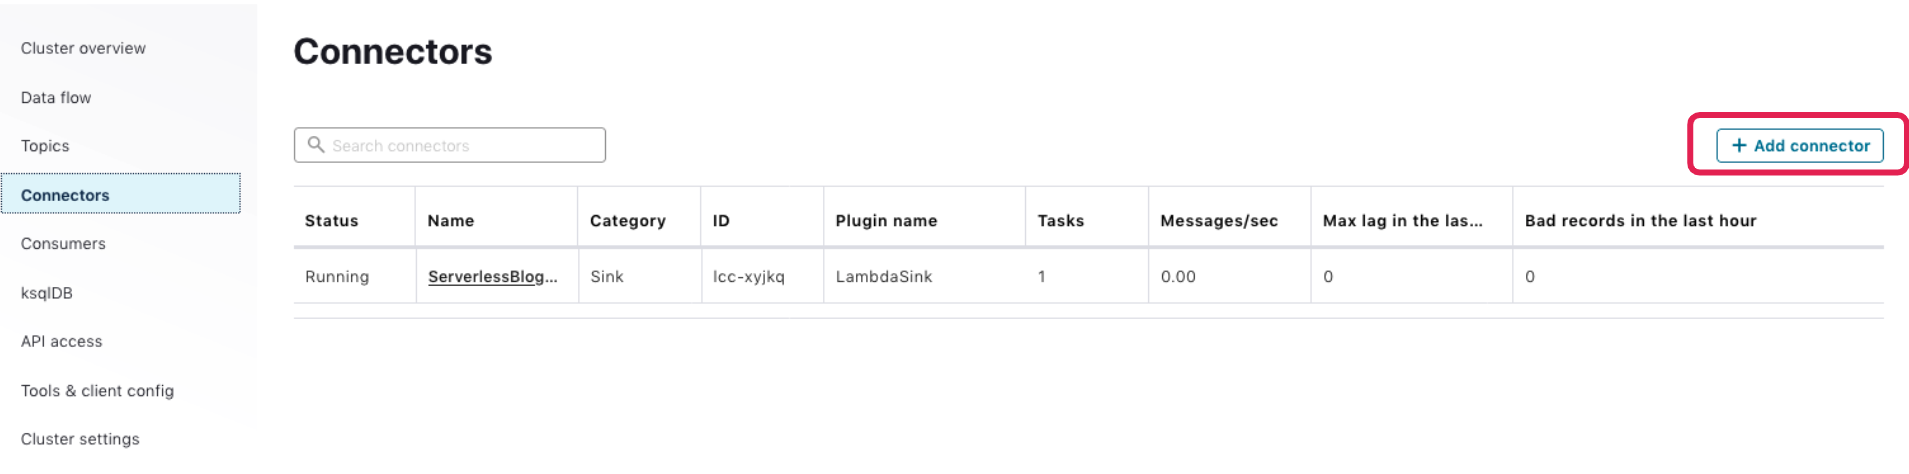
In a few minutes, the connector will be in a running state. You may pause/resume or even delete the connector using the buttons in the upper-right corner.

Configure and launch the Datagen Source Connector for Confluent Cloud
Using the Datagen Source Connector for Confluent Cloud, publish data into Timestream via a Kafka topic and the AWS Lambda function.
A quick reminder: We are using the Datagen connector simply as an example. In a real-world use case, there are many options for fully managed connectors that can also simplify sourcing event data into Confluent Cloud or sinking events into other services from Confluent Cloud.
Navigate back to the “Connectors” page, and click on + Add connector in the upper-right corner:
Select the Datagen Source Connector from the list:

On the “Add Datagen Source Connector” page, enter the information below:
| Name | DatagenSourceConnector |
| Kafka API Key | <Kafka_Key> |
| Kafka API Secret | <Kafka_Secret> |
| Topics | stockTopic |
| Output Message Format | JSON_SR |
| Datagen Details – Quick Start | STOCK_TRADES |
| Max Interval | 100 |
| Tasks | 1 |
Click Continue to proceed. On the “Test and Verify” page, click Launch to deploy the Lambda connector. Make sure you understand the cost associated with the connector.
In a few minutes, the connector will be running. You may pause/resume or even delete the connector using the buttons in the top-right corner.
Next, navigate to the Timestream Query Editor page, click on the Amazon Timestream service and Query editor tab. Select StreamingData for the database. You will see a Kafka table listed. Right-click on it and click Preview data before clicking Run.
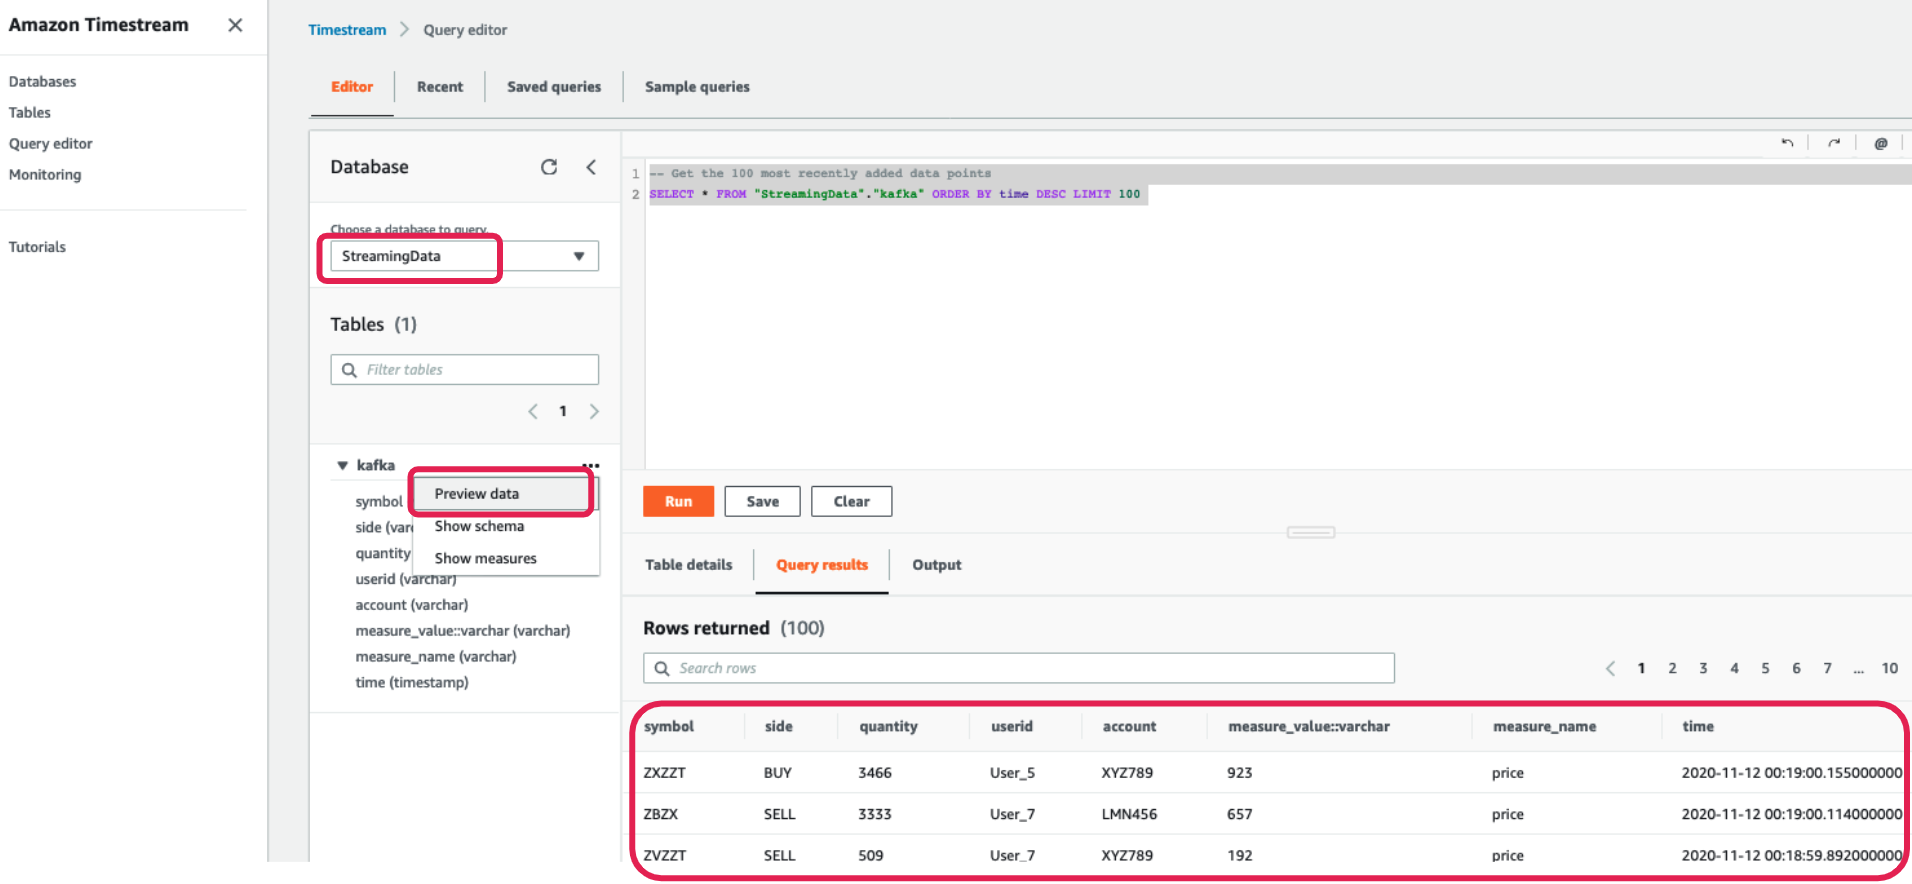
You will now be presented with sample data in the Timestream console.
Utilize Amazon QuickSight, another AWS serverless service, to visualize the data ingested into Timestream. You can follow the steps below to use Timestream with Amazon QuickSight. Create a simple dashboard with QuickSight using the data that you ingested from your Confluent Cloud cluster:

To learn more about creating visualizations in QuickSight, please see the AWS documentation.
Clean Up
Once you have completed the exercise, go ahead and delete the topic/cluster that you created in Confluent Cloud to avoid any unwanted resource consumption. Also, remember to clean up all AWS resources that you created using AWS CloudFormation. Use the AWS CloudFormation console or AWS CLI to delete the stack named Confluent-Serverless-Blog. Make sure you stop or pause the Confluent connectors that you started as part of this exercise to ensure you don’t incur additional charges.
Summary
In this post, we covered Confluent Cloud, its architecture, and how it can help you stream data from Kafka topics to Amazon Timestream using a fully managed AWS Lambda connector. We covered hands-on steps for launching a Timestream database, a table, an AWS Lambda function, and we also created a serverless Kafka cluster in Confluent Cloud, as well as set up a managed AWS Lambda connector to stream data directly into Timestream.
The best part is that we were able to achieve all of this without managing a single server or instance for a true serverless experience. Confluent Cloud offers a serverless experience with elastic scaling and usage-based billing so that you only pay for what you stream. Get started with a serverless experience for Apache Kafka by signing up for Confluent Cloud on AWS Marketplace today! Once you’ve signed up through AWS Marketplace and are logged into the Confluent Cloud UI, go to Billing & payment > Payment details & contracts > + Promo code, and use CL60BLOG to get an additional $60 of free Confluent Cloud usage.*
Get started with Confluent, for free
Watch demo: Kafka streaming in 10 minutes
このブログ記事は気に入りましたか?今すぐ共有
Confluent ブログの登録


Schema Registry Clients in Action
Learn about the bits and bytes of what happens behind the scenes in the Apache Kafka producer and consumer clients when communicating with the Schema Registry and serializing and deserializing messages.

How to Securely Connect Confluent Cloud with Services on Amazon Web Services (AWS), Azure, and Google Cloud Platform (GCP)
The rise of fully managed cloud services fundamentally changed the technology landscape and introduced benefits like increased flexibility, accelerated deployment, and reduced downtime. Confluent offers a portfolio of fully managed...